Monday, November 11, 2024
DIY Pole Barn: How to Build a Secure Structure for Farm Use

A pole barn, also known as a post-frame building, offers a cost-effective and versatile solution for a wide range of farm needs, from housing livestock and storing equipment to providing workspace for various agricultural tasks. Building a secure and durable pole barn requires careful planning, precise execution, and the use of high-quality materials. This comprehensive guide will walk you through the entire process, from initial design considerations to final finishing touches, equipping you with the knowledge necessary to construct a reliable and functional pole barn for your farm.
1. Planning and Design:
Purpose and Size: Clearly define the purpose of the barn and determine the necessary dimensions. Consider the type of livestock, equipment storage, or activities planned for the structure. Factor in future expansion needs to avoid potential limitations.
Location and Site Preparation: Choose a level and well-drained site for your pole barn. Conduct a thorough site survey, considering drainage patterns, utility connections, and access roads. Clear the site of debris, trees, and obstacles.
Building Codes and Permits: Familiarize yourself with local building codes and obtain necessary permits. Consider factors like wind loads, snow loads, and seismic zones.
Materials Selection: Select durable and weather-resistant materials, such as pressure-treated wood for posts and beams, metal roofing and siding, and concrete for the foundation. Opt for high-quality fasteners and components to ensure long-term durability.
Foundation Design: Choose an appropriate foundation system, such as concrete piers or a slab, based on soil conditions and building load. Ensure proper drainage and frost protection for the foundation.
Framing and Roof Design: Determine the best framing techniques and roof type for your needs. Consider truss systems, rafter layouts, and roof pitch.
Doors and Windows: Choose durable and weather-resistant doors and windows that provide adequate ventilation and security. Consider the size and placement based on intended use.
2. Foundation Construction:
Excavation: Prepare the site for the foundation according to your chosen design. Excavate the foundation footings to the specified depth and width, ensuring level and proper drainage.
Concrete Piers: For pier foundations, pour concrete into the excavated footings using rebar for reinforcement. Allow sufficient curing time for the concrete to reach full strength.
Slab Foundation: For a slab foundation, pour concrete over a compacted gravel base. Install rebar and control joints for structural integrity and crack prevention.
Drainage and Frost Protection: Implement proper drainage systems around the foundation to prevent water accumulation and frost heave.
3. Framing and Roof Construction:
Post Installation: Erect the pressure-treated posts in the prepared foundation, ensuring verticality and alignment. Use heavy-duty hardware and anchor bolts to secure the posts to the foundation.
Beam Installation: Connect the posts using beams, creating a strong structural framework. Ensure proper spacing and alignment for load distribution.
Trusses or Rafters: Install truss systems or rafters to support the roof structure. Ensure proper fastening and alignment for a secure and stable roof.
Roof Sheathing and Decking: Apply roof sheathing over the truss system, providing a solid base for the roofing material. Install roof decking for added strength and support.
Roofing Installation: Install the chosen roofing material, such as metal roofing, shingles, or other durable options. Ensure proper flashing and sealant for watertightness.
4. Siding and Insulation:
Siding Installation: Install the chosen siding material, such as metal siding, wood siding, or vinyl siding, over the framing. Ensure proper overlaps and water-resistant barriers.
Insulation Installation: Install insulation between the framing members to improve energy efficiency and create a more comfortable interior environment. Consider using spray foam, fiberglass batts, or rigid foam insulation.
Vapor Barrier: Install a vapor barrier between the insulation and the interior wall finish to prevent moisture buildup within the walls.
5. Doors, Windows, and Finishes:
Door Installation: Install the doors, ensuring proper hinges, locks, and weatherstripping for security and weather resistance.
Window Installation: Install the windows, ensuring proper framing, flashing, and weatherstripping. Consider energy-efficient windows for optimal performance.
Interior Finishes: Complete interior finishes, such as drywall, paint, flooring, and electrical wiring. Customize the interior according to your intended use and desired aesthetic.
6. Safety Precautions:
Safety Gear: Always wear appropriate safety gear, including hard hats, safety glasses, gloves, and steel-toe boots, during construction.
Fall Protection: Use ladders and scaffolding with proper fall protection systems when working at heights.
Electrical Safety: Exercise extreme caution when working with electrical wiring. Ensure proper grounding and circuit protection.
Tool Safety: Use tools according to manufacturer instructions and maintain proper safety procedures.
7. Maintenance and Care:
Regular Inspections: Conduct regular inspections of the pole barn structure, checking for any signs of damage, wear, or decay.
Roof Maintenance: Clean gutters and downspouts regularly to prevent water damage. Inspect roofing material for leaks and replace damaged sections as needed.
Siding Maintenance: Clean siding regularly to remove dirt, grime, and debris. Repair any damaged sections promptly to prevent water infiltration.
Foundation Maintenance: Check for cracks or movement in the foundation. Address any issues immediately to prevent further damage.
Conclusion:
Building a secure and durable pole barn for farm use requires careful planning, meticulous execution, and the use of high-quality materials. This comprehensive guide provides a foundation for successfully constructing a functional and long-lasting structure. Remember to prioritize safety at every step, follow local building codes, and implement regular maintenance practices to ensure your pole barn continues to serve its intended purpose for many years to come.

DIY Guide to Building a Pole Barn with Custom Roof Features

Alright, you've decided to build a pole barn. Maybe it's your dream workshop, a spacious storage solution, or even a funky guest house. Whatever the reason, you're about to embark on a fun, challenging, and rewarding project. And let's be honest, who doesn't love a good pole barn? They're sturdy, versatile, and often cheaper to build than traditional structures.
But you're not settling for a plain Jane barn. You want some oomph. You want custom roof features. Think unique dormers, eye-catching overhangs, or even a cool cupola. No problem, friend! We're here to help you build that dream barn, roof and all.
Let's Get Started: Planning Your Pole Barn Empire
Before you start hammering away, there's a bit of planning to do. Think of it as laying the foundation for a successful project (pun intended!).
The Big Picture: Design & Permits
Draw it Up: Start with a basic sketch of your barn. This doesn't have to be fancy, but it should include dimensions, roof pitch, and any special features you're dreaming of.
Consult the Experts: Check with your local building department to understand the regulations for your area. They'll help you with things like setbacks, foundation requirements, and load restrictions.
Choosing Your Materials:
Pole Size Matters: This depends on the size and weight of your roof and any snow load you need to consider. Consult a local engineer for guidance.
Roofing Materials: Do you want a classic metal roof, durable shingles, or maybe something a little more unique?
Don't Forget the Extras: Think about insulation, windows, doors, and any interior finishing touches.
Building the Foundation: Laying the Groundwork
Now that your plan is set, let's build that base. Pole barns are all about the poles, and you'll need to install them correctly to make sure your barn stands strong.
1. Digging In: You'll need holes for your poles that are deep enough to support the load. The exact depth will depend on your local frost line and the pole size.
2. Setting the Poles: Place the poles in the holes, making sure they're plumb and level. You can use concrete or gravel to secure them in place.
3. Topping it Off: Use a pre-engineered steel beam to connect your poles at the top. This will form the base for your roof.
Roofing Time: Making Your Barn Stand Out
Now for the fun part - crafting your custom roof features! Here are some ideas to get those creative juices flowing:
Dormers: Add a touch of charm and increase natural light with dormers. They can be simple rectangles or take on more intricate shapes.
Overhangs: Create a welcoming porch or a shady spot with generous overhangs. You can add a decorative fascia board for a polished look.
Cupola: For a truly unique design, consider adding a cupola to your roof. This decorative structure can add a touch of elegance while also providing ventilation.
Skylights: Let natural light flood in with strategically placed skylights. Consider using tempered glass for safety.
Building the Roof:
1. Framing the Roof: Use wood trusses or rafters to build the frame for your roof. Make sure to follow your design plans carefully and check for squareness at every step.
2. Sheathing the Roof: Apply plywood or OSB sheathing to the roof frame. This creates a solid base for your roofing materials.
3. Installing the Roof: Now, for the exciting part: install your roofing materials. Whether you're using metal, shingles, or something else, follow the manufacturer's instructions carefully. This is where you can really make your roof unique.
Finishing Touches: Adding Some Personal Flair
Once your roof is on and you're feeling proud of your handiwork, it's time to add the finishing touches.
Siding: Choose a siding material that complements your roof and adds to the overall aesthetic.
Doors and Windows: Add charm with custom doors and windows. Consider adding a Dutch door or a large sliding barn door for a touch of personality.
Interior Design: Make your barn truly yours with thoughtful interior design. Think about insulation, paint colors, and lighting to create a space you'll love.
Remember, Building a Pole Barn is a Journey:
Building your own pole barn with custom roof features is a rewarding journey. Be patient, stay focused, and don't be afraid to ask for help when you need it. There are countless resources available to guide you, from online tutorials to local contractors.
And most importantly, have fun! This is your chance to create a space that reflects your unique style and meets your needs. So, get out there, grab your tools, and build that dream pole barn! You've got this!
Building a 12x16 garden shed for seasonal storage

Alright, folks, let's talk sheds! You know, those little havens in your backyard where you can stash all the stuff that's cluttering up your garage, basement, or even your living room. I'm talking about that extra lawnmower, the winter tires, the holiday decorations, or maybe even a collection of vintage lawn ornaments (no judgment here!).
But before you start digging that pit for the foundation, let's get down to the nitty-gritty of building a 12x16 garden shed for all your storage needs. I'm not going to bore you with a bunch of technical jargon, just good old-fashioned advice from someone who's been there and done that (and maybe even done that a couple of times!).
First things first: Planning is key!
You're not just throwing up a cardboard box here, you're creating a mini-structure that should last you for years. So, grab a pen, some paper, and maybe even a glass of iced tea.
Location, location, location: Where's the best spot for your shed? Consider access (you don't want to be lugging stuff across a muddy field), sunlight (if you're storing sensitive items), and proximity to your house (don't make it a trek to fetch your tools!).
Budget: Be realistic! Sheds can range from the DIY-friendly budget variety to those fancy, pre-fabricated models. Decide what you're comfortable spending and stick to it.
Materials: Wood, metal, plastic… oh my! Each has its pros and cons. Wood is classic and can be customized, metal is durable and low-maintenance, and plastic is affordable and lightweight.
Size: 12x16 is a good starting point. It's big enough to store a lot, but not so big that it becomes a mammoth project. Consider the height, too - do you need to store tall items?
Doors and Windows: More than just aesthetics! A sliding door might be easier to use in tight spaces, while a double door allows for larger items. A window can let in some light and ventilation.
Foundation: Don't skip this step! A simple concrete slab will keep your shed stable and dry, especially if you live in a region with frost heaving.
Let's Get Building (or Maybe Not...):
Now, here comes the big question: Are you going to build it yourself, or are you going to hire someone?
DIY: The ultimate sense of satisfaction! It can be a lot of fun, and you can save some money. But be honest with yourself about your skills and time commitment. Building a shed takes time, patience, and a few basic carpentry skills.
Hiring a Contractor: Less stress, more time! If you're not comfortable with construction, or just don't have the time, hiring a contractor can take the pressure off. Just make sure to get multiple quotes and check their credentials.
Tips for the DIY Crowd:
Start with a solid foundation. This is the cornerstone of your shed. Don't skimp on the materials or the process.
Measure twice, cut once. This is the golden rule of carpentry. A little extra time measuring can save you a lot of frustration down the road.
Choose quality materials. You don't want to end up with a flimsy shed that's falling apart after a few seasons. Invest in good lumber, hardware, and roofing materials.
Don't be afraid to ask for help. Even the most experienced builder can use an extra set of hands sometimes. Don't be shy about asking friends or family for assistance.
A Few More Things to Keep in Mind:
Ventilation is key! You don't want your shed to become a stuffy, musty mess. Make sure to include proper ventilation to keep the air circulating.
Think about security. Consider adding locks, security cameras, or even motion sensor lights to deter thieves.
Don't forget the finishing touches! Paint or stain the exterior, add a nice door handle, and maybe even some landscaping around the shed.
Finally, remember this: Building a shed is a project, not a race. Take your time, enjoy the process, and be proud of your handiwork. It's your little slice of storage heaven, after all!
Sunday, November 10, 2024
How to build an 8x10 shed that doesn’t break the bank
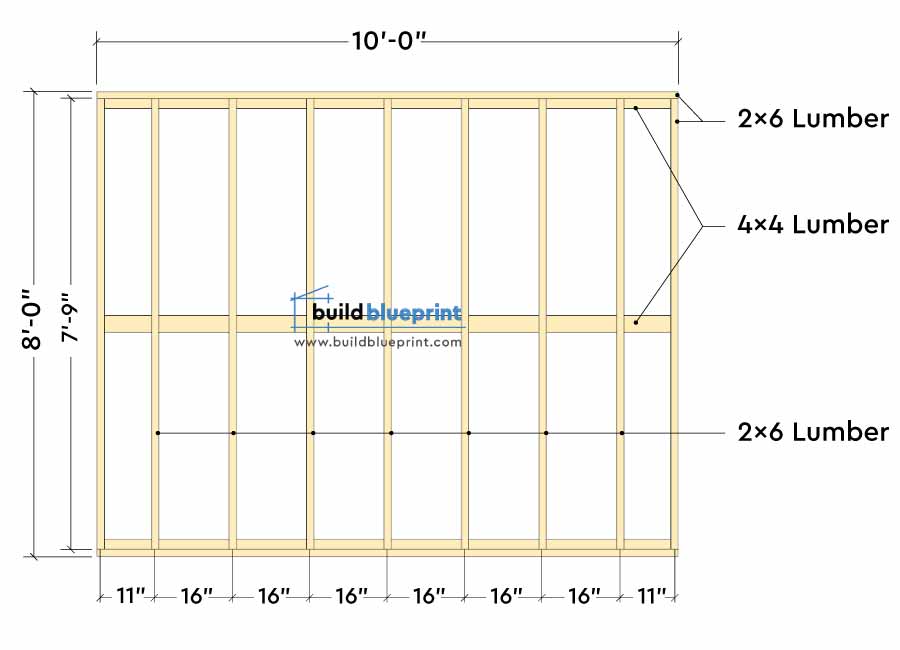
Alright, you're looking to build an 8x10 shed and you want to do it without emptying your wallet? You've come to the right place. We're about to break down how to build a shed that's affordable, functional, and something you can be proud of.
Before we get started, let’s talk about your goals.
What will you use this shed for? Storage for tools, bikes, garden equipment, a workshop, a hangout space? This will help you decide what features are essential.
What materials are you comfortable working with? Wood is the most common, but you can also build a shed with metal or even recycled materials.
How much time and energy are you willing to invest? Building a shed takes time, but there are ways to make it more manageable.
Now, let’s dive into the budget-friendly shed building plan!
1. Planning and Design:
Start with a sketch. This doesn't need to be fancy, but it helps visualize the shed's layout. Think about where you want the door, windows, and any shelving you might need.
Don't overcomplicate things. Keep the design simple. This will save you time and money.
Think about your site. Make sure your shed fits the space you have. Consider factors like sunlight, drainage, and accessibility.
Choose your materials. Wood is generally the most affordable option. For framing, consider using pressure-treated lumber for the foundation and floor joists to prevent rot. For siding, you can choose from affordable options like plywood, cedar, or even corrugated metal. Think about the local lumber prices and look for deals.
Consider pre-made components. You can save time and money by purchasing pre-made shed doors, windows, and even roof trusses. Many home improvement stores sell these, and you can even find them online.
2. Building the Foundation:
The foundation is your shed's base. This is where you’ll be spending some time, so make sure it's solid. A simple concrete pad is an affordable and durable option.
Decide on the size and location of your pad. The concrete should extend at least 4 inches beyond the shed's footprint for support.
Hire a concrete contractor or do it yourself. If you're handy, you can pour the concrete yourself. But if you’re not comfortable with concrete work, a contractor can save you time and ensure a quality foundation.
3. Framing the Shed:
This is where the fun begins! Building the frame is a rewarding step and a good way to test your carpentry skills.
Use pre-cut lumber. Many lumber yards offer pre-cut framing lumber, saving you time and ensuring accuracy.
Follow your design. Carefully build the walls and roof using your plan as a guide. Make sure your measurements are precise.
Consider using recycled materials. Old pallets, fence boards, or even salvaged wood can be used for the shed frame.
4. Sheathing and Siding:
Sheathing provides a solid base for the siding and protects your shed. You can use plywood, OSB, or even corrugated metal for this.
Siding gives your shed its exterior look. Choose a material that fits your budget and style. Plywood, cedar, corrugated metal, or even vinyl siding can all look great.
For a budget-friendly look, consider painting the shed. A fresh coat of paint will spruce up the look and protect your siding.
5. Roofing and Finishing Touches:
Choose a roofing material. Shingles are affordable and durable. You can also consider metal roofing for a modern look and longer lifespan.
Don’t forget the flashing! Install flashing around the roof edges and chimney (if you’re adding one) to prevent water damage.
Install the doors and windows. Pre-made doors and windows save time and money. Make sure they fit snugly in the frame to prevent drafts.
Add finishing touches. Install trim, moldings, and hardware like handles and hinges. You can even add a decorative overhang or eaves for a more finished look.
6. Finishing the Interior:
Insulate your shed. Adding insulation will make your shed warmer in the winter and cooler in the summer. Fiberglass batt insulation is a good affordable option.
Add flooring. You can use plywood, concrete, or even tile. Consider a durable and easy-to-clean material that’s appropriate for your shed’s purpose.
Install shelving and storage. This is a great way to maximize your shed's space. You can build your own shelves using lumber or buy ready-made shelving units.
Add lighting and electrical outlets. These are essential for a functional shed, especially if you plan on using it as a workshop or storage space.
7. Maintenance:
Keep your shed clean and organized. This will make it easier to find what you need and prevent damage to your belongings.
Check for leaks and damage. Regular inspections can prevent problems before they become major issues.
Paint or stain the exterior every few years. This will keep your shed looking good and protect the siding from the elements.
Here are some bonus tips for building a shed on a budget:
Get creative with your design. Don't be afraid to experiment with different materials and techniques.
Look for discounts and deals. Home improvement stores often have sales on lumber and building supplies.
Ask for help from friends and family. Having extra hands on deck can make the project go faster.
Shop around for the best prices. Don’t just buy from the first store you visit. Compare prices and look for deals online.
And remember, building a shed is a rewarding experience! You'll be able to enjoy your hard work and the sense of accomplishment that comes from creating something with your own hands. Just take it one step at a time, and you'll be surprised at how quickly your budget-friendly shed comes together. Good luck!
How to organize and store firewood in your own shed

Alright, you've got your wood, you've got your shed, now it's time to get organized! Storing firewood properly isn't just about keeping things neat and tidy. It's about keeping your wood dry, well-ventilated, and ready to burn when the chill sets in.
Let's break it down, step by step.
Step 1: The Shed - Your Firewood Fortress
First, let's talk about your shed. It's your wood's home, so make sure it's a good one!
A solid foundation: You don't want your shed sinking or shifting, especially with a heavy load of wood. A concrete foundation is ideal, but a well-built wooden platform will do the trick.
Ventilation is key: Think airflow! Good ventilation keeps moisture out, preventing rot and mold. Add vents high up on the walls and consider a louvered door for extra airflow.
Roof protection: A solid roof will keep your wood dry from rain and snow. Make sure it's properly sealed to prevent leaks.
Step 2: The Stack - It's All About Structure
Now comes the fun part - stacking your wood! A good stack keeps your wood stable, dry, and ready for burning. Here's how:
Foundation first: Start with a base of treated lumber or stacked bricks to keep your wood off the ground and allow for airflow.
Start stacking: Place your first layer of logs perpendicular to the shed wall. Leave a gap of about an inch between each log for air circulation.
Go vertical: Each subsequent layer should be stacked perpendicular to the previous one, creating a "crib" effect. This interlocking pattern adds strength and stability.
Cap it off: Finish with a top layer of logs to protect the stack from the elements. You can use a tarp or a sheet of plywood to keep the stack dry during heavy rain.
Step 3: Wood Selection - Knowing Your Fuel
Not all wood is created equal! Choosing the right type of wood will make a difference in your fire's heat, aroma, and burn time.
Hardwoods for heat: Hardwoods like oak, maple, and hickory are known for their long burn times and high heat output. They're perfect for those cold winter nights.
Softwoods for a quick flame: Pine, fir, and spruce burn quickly and easily, making them ideal for starting a fire or adding a quick burst of heat.
Don't mix and match: Keep similar types of wood together in the stack. This ensures consistent burning and helps you keep track of your fuel.
Step 4: Seasoning - Patience is Key
Freshly cut wood is full of moisture, making it difficult to burn efficiently. That's why you need to season your wood!
Time is your friend: Seasoning wood takes time, usually 6 months to a year. The ideal moisture content for firewood is around 20%.
Storing for optimal drying: Stack your wood in a well-ventilated area, ideally with the logs off the ground. This allows air to circulate, speeding up the drying process.
Check for dryness: Tap a log. If it sounds hollow, it's probably dry enough to burn. You can also check the weight; dried wood will feel lighter than fresh-cut wood.
Step 5: Beyond the Basics - Firewood Storage Hacks
Now that you've got the fundamentals down, let's get into some cool tricks to take your firewood storage to the next level:
Keep it tidy: Use a wheelbarrow or a log cart to easily transport wood from the shed to your fireplace.
Utilize the space: Build shelves or racks inside your shed to store smaller pieces of wood or kindling.
Create a wood rack: Build a freestanding wood rack outside your shed for easy access. This is especially useful for storing wood that you plan to use soon.
Get creative with stacking: Experiment with different stacking patterns to maximize space and create a visually appealing wood display.
Think about the future: Store your wood in a way that makes it easy to access and manage. This will save you time and effort in the long run.
Bonus Tips:
Keep it clean: Sweep out your shed regularly to prevent the buildup of dust and debris.
Protect your wood: Consider using a sealant or stain to protect your wood from the elements.
Stay safe: Use caution when handling firewood. Be aware of any potential hazards and wear appropriate protective gear.
Firewood storage is more than just a chore - it's an art! By following these tips, you'll be well on your way to creating a tidy, efficient, and aesthetically pleasing storage solution for your firewood. So, grab your tools, get creative, and get stacking!
How to build a garden shed with a storage loft

Alright, so you're thinking about building a garden shed, but not just any ordinary shed. You want a shed with a storage loft! That's awesome, you're going for the ultimate storage space! And guess what? It's totally doable, even if you're not a seasoned carpenter.
Let's break this down step-by-step, like we're having a chat over a cup of coffee.
First, the Big Picture: Planning Your Shed
Before we get our hands dirty, let's get clear on what we're building. Think about these things:
Size: How much stuff do you need to store? Do you need space for tools, lawn equipment, bikes, or maybe even a workbench? A 10x12 shed is a pretty standard size that's good for most folks, but if you need more room, don't be afraid to go bigger.
Location: Where in your yard will the shed live? Consider sunlight, drainage, and how close it is to your house.
Materials: Wood is classic for sheds, but you can also find pre-fab kits or even metal sheds. Each material has pros and cons, so do your research!
Style: Do you want a traditional gable roof or a more modern style? A shed with a loft can be charming or sleek, depending on your taste.
Let's Build a Foundation
Now, this is important. Your shed needs a solid foundation. You don't want it sinking or tilting over time. Here's a good way to do it:
1. Level and Prepare: Use stakes and string to mark out your shed's footprint on your lawn. Then, remove the sod and dig a trench around the perimeter, about 6 inches deep. Make sure the bottom of the trench is level!
2. Pour Concrete: Now for the fun part - pouring concrete. You can use pre-mixed concrete from a home improvement store or mix your own. Make sure it's at least 4 inches thick. Let it cure for a couple of days.
3. Framing the Floor: Once the concrete is set, you'll start framing the floor. This involves using treated lumber (because it's resistant to moisture) to build a frame that sits on the concrete base. Use joists that are spaced 16 inches apart for strength.
Time to Frame the Walls
Now we're getting into the meat of the project. Building walls requires precision, but you'll feel like a real carpenter!
1. Cut and Assemble the Walls: Measure and cut your wall studs using a saw. Then, use nails or screws to attach them to the floor frame. Make sure your walls are square!
2. Sheathing: Sheathing, which is plywood or OSB (oriented strand board), adds strength and provides a surface to attach siding later on. Attach it to the walls using nails or screws.
3. Roof Framing: Now, you're going to frame the roof. This involves building the roof trusses (the triangular frames that support the roof). There are different types of trusses, so choose what works best for your shed design.
4. Roof Sheathing: Just like the walls, you'll sheathe the roof to give it strength and a base for the roof covering.
Building the Loft
Alright, here's where the fun really begins! This is what makes your shed stand out.
1. Loft Floor Framing: Before building the loft floor, measure the space for your loft and determine the best location for the stairs. Now, frame the loft floor just like you did for the main floor, using joists spaced 16 inches apart. Make sure to support the joists with posts that are anchored to the ground.
2. Stair Construction: This might require a little more planning. You'll need to build a sturdy stairway that leads to the loft. Look for DIY stair plans online for guidance.
3. Loft Walls: To enclose the loft, you'll need to build walls just like the main shed walls. Again, use treated lumber and sheathing for strength.
Finishing Touches: Siding, Roof, and Doors
We're nearing the home stretch! Now comes the part where your shed starts to look like a real shed.
1. Siding: Choose a siding material that complements your yard and style. You can go for traditional wood siding, vinyl siding, or even metal siding.
2. Roofing: Select a roof covering that's durable and weather-resistant. Shingles, metal roofing, or even rubber roofing are popular choices.
3. Doors and Windows: Choose doors that provide easy access and security. Windows can add natural light and ventilation. Don't forget to install the door and window hardware.
The Interior: Making it Your Own
Now it's time to make your shed feel like home.
1. Insulation: Consider adding insulation to the walls and ceiling for added comfort and energy efficiency.
2. Drywall: Drywall adds a finished look to the interior walls and ceiling. You can paint it or wallpaper it to match your style.
3. Electrical: If you want to add lights or outlets, you'll need to run electrical wiring and have it inspected by a licensed electrician.
The Moment of Truth: Enjoying Your Shed
After all the hard work, you've built a fantastic shed with a storage loft! Now it's time to organize your stuff, enjoy the extra space, and maybe even relax in your cozy new shed with a cup of coffee.
Remember, building a shed with a loft is a project that requires time, patience, and maybe a few extra hands on some days. But trust me, the satisfaction of creating something with your own hands is worth the effort. And the extra storage space? Pure bliss!
Essential steps to build a sturdy 12x16 shed

Alright, let's build a shed! A 12x16 shed is a great size - big enough for a workshop, storage, or even a small hangout space, but still manageable for a DIY project. You're gonna need some tools, some materials, and a little bit of patience, but I promise, it's super rewarding to build something with your own two hands.
First, Let's Talk About the Foundation:
The Concrete Slab: This is the most common and sturdy foundation for a shed. It's durable, level, and will keep your shed from sinking or shifting. You'll need to pour a concrete slab that's at least 4 inches thick and extends a few inches beyond the perimeter of your shed. If you're not familiar with concrete work, you might want to hire a professional for this part.
The Wood Frame Foundation: This is a more affordable option, but it requires some extra work. You'll build a frame of pressure-treated lumber and set it on concrete piers or blocks. The frame needs to be perfectly level to prevent your shed from being wonky.
The Gravel Foundation: This is a good option for areas with poor drainage. You'll lay down a layer of gravel, then build a frame on top of it. This will allow water to drain away, preventing rot and keeping your shed dry.
Choosing Your Building Materials:
The Framing: You'll be using lumber for the walls, roof, and floor. Pressure-treated lumber is a must for anything that touches the ground to resist rot and insects. For the rest of the frame, go with standard framing lumber like spruce or pine. Make sure it's straight and free of knots, especially for the walls and roof.
The Sheathing: This is the material that goes on top of the framing. You can use plywood, OSB, or even tongue-and-groove boards. Plywood and OSB are strong, affordable, and easy to work with.
The Siding: This is the outer layer of your shed that's going to make it look pretty. You have lots of options here! Vinyl siding is super easy to maintain and comes in a wide variety of colors. Wood siding gives you a more traditional look and can be stained or painted. There's also metal siding, which is super durable.
The Roofing: The roof is crucial to protect your stuff. Asphalt shingles are a popular choice, they're affordable and easy to install. Metal roofing is another good option, it's durable, and comes in different styles. You can even get fancy and use cedar shakes or slate tiles, but those are more expensive.
Let's Get Building!
1. Plan and Prep: Measure and mark out the location of your shed. Get your foundation in place (concrete, wood frame, or gravel). Level it out perfectly - you don't want your shed to be tilted!
2. Build the Floor: Once your foundation is ready, you can start building the floor joists. These are the long beams that run across the width of your shed. They're typically spaced 16 inches apart. Once they're in place, you can screw on the subfloor sheathing (plywood or OSB) to create a solid base.
3. Erect the Walls: Now comes the fun part - building the walls! Start by building the wall panels on the ground. Cut and attach the studs, plates, and sheathing. Once the panels are built, you can raise them onto the floor joists and secure them to the floor and to each other.
4. The Roof: Your roof is going to be supported by the wall framing. You'll add rafters to run across the width of the shed. Make sure the rafters are properly spaced and secured to the walls. Once the rafters are in place, you can add the roof sheathing (plywood or OSB).
5. Finishing Touches: Time to give your shed its personality! Add the siding, trim, windows, and a door. If you're using asphalt shingles, nail them onto the roof sheathing. If you're using metal roofing, you might need to install flashing and other components before laying down the metal panels.
Some Tips for Building a Successful Shed:
Measure twice, cut once: This is a universal DIY rule, especially when you're working with wood. Double-check all your measurements before you start cutting.
Use a level: Leveling is crucial to make sure your shed is straight and stable. Check for levelness as you go, not just at the end.
Get help: Don't be afraid to ask for help. Building a shed is easier with two pairs of hands, especially when raising the wall panels and putting on the roof.
Don't rush: Take your time and enjoy the process. It's better to do things right the first time than to have to redo them.
Celebrate!
You did it! You've built your own shed. Enjoy the satisfaction of a job well done and the extra space you've created. And remember, a shed is a great place to start your next DIY project. Maybe a chicken coop? A playhouse? The possibilities are endless!